Author Archives: GCSDev

Rain Barrels

You’ve heard it said, “When it rains, it pours.” In gardening terms, this could easily refer to the amount of rain on the roof going through the gutters and downspouts, and then out to the storm drains and pouring away from your garden. With the unpredictability of rain and the cost of water, don’t you wish you could keep some of that rain and put it to better use? You can, by installing a rain barrel, or two, or three or more. Rain barrels don’t have to be expensive or an eyesore.

The Best Rain Barrels

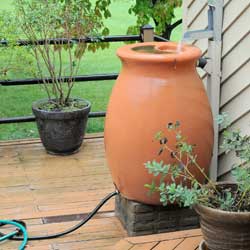
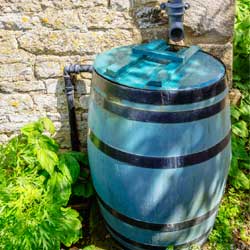
By diverting the gutter downspout to the rain barrel, rainwater is collected during a storm and stored. A fine mesh screen across the top prevents rocks and debris from entering the barrel and mosquitoes from laying their eggs. It’s a good idea to use a small amount of algaecide to prevent algae from building up in the barrel as well. Some barrels even have a solid cover with an opening to fit the downspout into, and the darkness inside the barrel helps inhibit algae growth.

Most rain barrels have two spigots, one at the top and one by the bottom. Attaching a hose to the top spigot redirects excess water when the barrel is full. You may use this to connect to another rain barrel that stores the overflow from the first, or you may position the overflow hose to direct excess rain to a nearby flowerbed, tree, garden or other plantings that can benefit from a good soaking.

A hose attached to the bottom spigot allows the stored water to flow for use. Incidentally, the water pressure increases if the rain barrel is elevated even just a few inches, allowing gravity to assist getting every drop of precious water out of the barrel so it can be put to use.

Value of a Rain Barrel

Is it worth it? According to the United States Geological Survey (USGS), a rainstorm measured at 1/10th of an inch, over a 20’x30′ roof, would more than fill a 32-gallon rain barrel if all the water is properly directed. Multiply this amount by your water charge per gallon and you’ll see it won’t take long to pay back the small investment made in a few barrels.

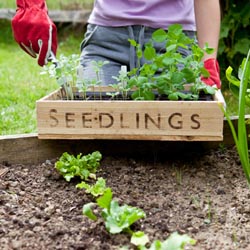
Furthermore, rainwater is often better for watering garden plots, containers, flowerbeds and new plantings, and is even better for many houseplants. Rainwater does not contain the same chemical treatments or compounds found in tap water, so collecting rainwater is a healthier alternative for keeping all your plants well hydrated.

Not sure which rain barrels will suit your style or how to set them up effectively? Stop in to see our collection and consult with our experts to choose exactly the barrel that will help meet all your watering needs.

barrel-3barrel-1

Yellowjackets: Good Guys or Bad?

When you hear “yellowjacket,” what’s the first thing that comes to mind? A buzzing, stinging insect ruining your outdoor meal or a treasured pollinator of many plants? A yellowjacket is both!

About Yellowjackets

The most commonly found yellowjacket is the Eastern yellowjacket (Vespula maculifrons). The Eastern yellowjacket is a wasp that is 1/2 to 5/8 inch long and is black and yellow striped. The body is curved under and is wider than the head. Yellowjackets do not have any “hairs” such as are found on honeybees and bumblebees.

Yellowjackets are generally ground nesters, however, in some situations, especially in urban areas, they will make their nest above ground such as in hollow walls and attics.

During the spring and summer, the colony population increases from the fertilized solitary queen, who survived the winter, to several thousand. Adult yellowjackets feed protein to the young wasps and larvae while they subsist on sugars. Foraging for food, the wasps cross-pollinate plants while seeking small insects and nectar. Yellowjackets provide a valuable service to humans by consuming numerous insects that eat ornamental and cultivated plants.

On the other hand, yellowjackets are drawn to cookouts, picnic areas and garbage cans. Their sting, unfortunately, is especially painful. Unlike honeybees, which only sting once, wasps can sting numerous times. Some people react severely to the venom and may have problems breathing or other dangerous reactions.

To Minimize Yellowjacket Interactions

Despite their good characteristics, many people prefer to keep yellowjackets away from picnics, play areas and yards. To reduce the possibility of inviting yellowjackets to your outdoor party…

  • Don’t leave moist pet food outside during the summer. Bird seed is fine, but not suet.
  • Keep garbage cans washed. Securely cover all garbage cans and recycling containers. Rinse beer, wine, soft drink and ice cream containers before disposing of them.
  • Keep garbage cans away from entertainment areas, play areas and pathways.
  • If eating outdoors, cover all serving plates and drinking glasses/bottles to prevent yellowjackets from getting into food or drink. When yellowjackets are in the area, be sure to check your food and drink before consuming.
  • Yellowjackets feed on aphids and scale on trees and shrubs. Therefore, spray for these pests in July and August, if needed, to remove that food source.
  • Repair dripping hoses and faucets as the puddles can attract wasps.
  • Wasps enjoy rotting fruit. Harvest tree and cane fruits when ripe. Carefully pick up all fallen fruit (gloves are a good idea!) and dispose of it in a covered container.
  • Wasps create a flight-path from the nest to food sources. Avoid this area. If this is not possible, consider removing the nest.

Yellowjacket Traps

To help make your outdoor gatherings more pleasant and safer, yellowjacket traps can be effective. Hang these around the perimeter of your yard if you plan to eat outside, but never hang traps near the food area, as you will only increase the attraction to that area. Some traps are disposable and have the benefit of reducing the sting possibility. Others are “reusable” and must be emptied and refilled with bait. These increase the probability of being stung but can be more affordable in the long term.

Eliminating Yellowjacket Nests

When absolutely necessary, the elimination of a yellowjacket nest should not be undertaken lightly. If it’s early in the season and the nest is visible, a forceful water blast will break it apart. To reduce the chances of being stung, do this during the day while the workers are not home. Wasps return to the colony as dusk. Sometimes the workers will begin rebuilding in the same place. Pesticide sprays can kill wasps, and after the nest is destroyed, spraying the area can discourage rebuilding. If it’s later in the season, the aerial nest may be too large to eliminate safely.

Underground nests are a much bigger challenge to destroy. Because the entrance may be at an angle to the nest, flooding seldom works. Never try to burn a yellowjacket ground nest by pouring kerosene or other flammable liquid into the entrance and lighting it. In addition to many stings, more serious injuries may occur. This also pollutes the soil and a fire can quickly get out of control. If the flight pattern to the entrance creates a serious hardship or is close to a building, it is best to consult with an expert for safe nest elimination.

If the yellowjackets have built their colonies within your house walls or attic, it may also be necessary to contact a professional. Note: if yellowjackets are nesting in your home, do not plug the entrance/exit hole or they may chew the rest of the way into your house! Our experts can offer a professional referral for local wasp removal services or search “Pest Control” for your city on the Internet or in the yellow pages.

Yellowjackets do have their uses, but if you have no use for these stinging insects, there are many ways to eliminate them safely. Using several techniques will be most effective and will minimize the risk of being troubled by wasps again.

wasp-3wasp-1

wasp-2

Woolly Adelgid

Woolly Adelgid is an aphid-like insect that is a serious pest of the Eastern Hemlock, Tsuga canadensis, and its cultivars. Adelgids need to be controlled as this insect spreads easily and rapidly and, if left untreated, can kill a mature hemlock in 4-10 years.

Recognizing Adelgids

Adelgids, formally called Hemlock Woolly Adelgids (Adelges tsugae) or HWA, present as a fuzzy, cottony white substance on the underside of hemlock needles. This is actually a waxy filament produced by the tiny, 1/16-inch insect as a covering and protection for itself and its eggs. These insects are native to Asia, and damage trees by sucking on the sap. As damage occurs, the needles of the tree become grayish rather than robustly dark green. When infected, trees may lose their needles and will not produce new growth on the damaged branches. Because infected trees are significantly weakened, they are subject to many other infections from diseases and pests, and ultimately die.

Controlling Adelgids

Exercising good horticultural practices is the best way to prevent Hemlock Woolly Adelgid infestations. Site your hemlock appropriately, in proper sunlight and a location where it can grow well without being cramped or crowded. Water and feed as required for optimum health, including adding extra fertilization or nutrition as required. A healthy tree will always withstand disease and insect problems better that one that is already stressed.

When Adelgids are present, apply insecticidal soap or horticultural oil in early April and again in June. Be certain to follow manufacturer instructions carefully and reach the underside of the needles where the Adelgids are located. When spraying in June, do so on a cooler, overcast day so as not to burn the Hemlock needles. If your Hemlock is too large to handle on your own, contact a trusted and licensed tree-care professional for treatment. Even after you have controlled an outbreak, annual spraying is recommended to be sure the pests do not reappear.

Other types of chemical treatments that can be used against these invasive pests include…

  • Foliage Sprays: These insecticides are sprayed over the entire tree to coat the foliage. They are stronger than soaps or oils and may be effective for 2-4 years. Higher toxicity can lead to other problems and contamination concerns, however, and applications should only be done by experienced professionals.
  • Soil Drenches: These are insecticides that are specially formulated to be absorbed by the tree’s roots and then will be consumed by the Adelgids as they sip on the tree’s sap. This can take longer to be effective, however, but it has long-lasting impact to control these insects. They should not be used where water sources may be inadvertently contaminated.

In some areas, predator beetles have been released to consume Adelgids, and while this is not yet effective on a widespread scale, there have been positive reports and limited success.

Hemlock Woolly Adelgids are a vicious, invasive pest, but with proper control techniques, their invasion can be stopped and the majestic hemlock forests renewed and restored.

file000412127175

Vegetable Garden Weed Control

You may want to grow many different things in your vegetable garden, but weeds probably aren’t on your favorite edibles list. Weeding can be an enormous time-drain and is one of the the least liked gardening chores. What’s wonderful is that we have so many weed control methods to choose from; there’s a solution for every type of gardener and their schedule.

Safe Control Methods in Edible Gardens

When it comes to vegetable gardening, many gardeners are very particular about what goes into their soil and onto their plants, as it will eventually end up on their plates and in their bodies. Here are some indisputable safe and effective ways to control weeds, without chemicals, in your veggie or any other garden for that matter.

  • Apply corn gluten meal to prevent weed seeds from germinating (don’t use if direct seeding your garden as all seeds will be affected).
  • Plan your garden to crowd edible plants together, effectively crowding out weeds because there isn’t space left for them to grow.
  • Manually pull weeds when the soil is wet and roots are looser. This can be done after a natural rainfall or after supplemental watering.
  • Hoe when the soil is dry to break apart weeds and damage their roots. Pick up larger weeds after hoeing so they cannot reestablish themselves.
  • Mulch with salt hay which contains no weed seeds. The hay will shield weed seeds from the sunlight and moisture they need for germinating.
  • Lay biodegradable and compostable mulch film down to create a firm barrier to keep weeds out or to prevent existing weed seeds from germinating.
  • Attract seed-loving birds such as finches and sparrows, which will happily eat hundreds of weed seeds each day for natural control.
  • Consider raised beds or container gardening to more effectively control weeds and make any remaining weeding easier.
  • Use fire (with all appropriate safety precautions) to burn out unwanted weeds, especially in pathway areas or along garden borders.
  • Treat exposed weeds with boiling water – the hotter the better – to cook and kill them. Several treatments may be needed for the best effects.

Weeds can be some of our worst enemies in the garden, and it is impossible to eliminate every single weed all the time. By using multiple methods and keeping on top of the task, however, it is possible to minimize weeds and make this chore less onerous, without resorting to harsh chemicals.

VeggieWeedControl

Viburnums

Viburnums are one of the most outstanding groups of shrubs for use in landscape planting. Varying in height from 2-30 feet, viburnums can be found to suit most any planting location. Their varied growth habits, excellent foliage, striking and fragrant flowers, showy fruit and interesting winter appearance make them an excellent choice for most gardeners.

Which Viburnum to Choose

Effective in many situations, the smaller shrub forms, such as Viburnum carlesi ‘Compacta’ and V. opulus ‘Compactum’, are excellent for planting close to houses or in tighter spaces, such as narrow flowerbeds or in side yards. The larger forms, such as V. lantana and V. prunifolium, make good specimen and screen plantings to be a centerpiece in the garden or provide privacy. Which one will work best in your landscape will also depend on the available space you have, your soil type and the sunlight needs of individual plants.

Flowers and Foliage

Viburnum flowers, primarily white in color, are borne in clusters, ranging from a rounded snowball shape to a flat form. Large, white snowball clusters of florets are found on V. carlcephalum and V. macrocephalum. Half-round flower forms are borne on such types as V. carlesi and V. burkwoodi. Most of the others have a flat cluster of florets such as V. plicatum ‘Tomentosum,’ V. dilatatum and others.

Viburnum foliage can be extraordinary with types that include a velvety smooth leaf surface, bold rough-veined textures and glossy leathery character, all of which add more textural interest to the landscape. In addition, some forms have attractive fall leaf color such as the purplish red of V. dentatum and V. dilatatum, as well as the brilliant red of V. opulus.

Brilliant Berries

In the fall and winter there is also ornamental value with berries. Many viburnums produce lovely fruits in shades of red, pink, yellow and blue-black which not only add to fall and winter interest, but can also be attractive to birds and other backyard wildlife.

Viburnum Care

With so many many pleasing aesthetic features of these plants, how easy are they to care for? Easier than you may think! Viburnums are very hardy, resistant to serious pests, thrive in a variety of soil and environmental conditions and require little pruning. They will grow in either sun or shade; however, flowering and fruiting will be more profuse in a sunny location.

With so much to choose from and so many advantages to these shrubs, there’s sure to be one to suit all your landscaping needs. Stop in to consult with our landscaping experts today, and we can help you choose the perfect viburnum to complement your landscape.

viburnum_2

viburnum_1

Clematis

Beautiful, showy clematis are not as difficult to grow as you might think. Learning when to prune your clematis and giving a little attention to their few requirements will reward you with a magnificent show of colorful blooms.

Planting Clematis

A beautiful clematis starts with proper planting. Clematis prefer to have their roots in the shade and their tops in the sun. Keep the roots cool with a well-drained rich soil with added compost, peat moss or composted manure and a good layer of mulch. Planting ground cover or other low growing perennials around the base of your clematis will also help to keep the soil cool and minimize weed growth. Organic amendments will help to retain moisture when added to the soil. Feed monthly with a liquid fertilizer or use a slow release fertilizer which can last for up to six months.

A Note About Bloom Rates

For the first few years, clematis may be slow to grow. Just keep in mind that it is establishing its root system, which is essential to a healthy, vibrant plant. In its first year, your clematis may produce very few flowers or even none at all. By the second year there will be more growth and a few flowers. By the third year you should see substantial growth and many lovely blooms.

Planting Clematis

For the best chance of success if you are new to gardening with clematis, buy plants in larger containers. While smaller starts will be less expensive to buy, they will take a little more work to establish and can be more delicate and prone to failure. If you purchase a pot of any size and are not planting it in the ground immediately, be sure not to allow the soil in the container to dry out or the plant may be overly stressed and vulnerable.

Keep the climbing habit of clematis in mind when selecting your planting site. Allow your plants to grow up into large shrubs and trees, or on a trellis against a sunny wall. Select varieties with growth that will not exceed your shrub or trellis; a 20-foot vine may overwhelm a smaller shrub or a weak trellis and will look overgrown and out of place.

Proper Pruning

Clematis are divided into three distinctive groups. Knowing what group your clematis falls under will guide you on when and how to prune.

These pruning suggestions are for established vines that have been in the ground for at least three years. Young vines should all be pruned to 12 inches the second spring and to 18 inches the third spring. This helps to develop more shoots, a fuller vine and a better root system.

  • Group 1
    This group includes certain species clematis and their cultivars which bloom early in the year. Some of the more familiar representatives of this group include the Montanas, varieties of C. alpina and C. macropetala. All of the Group 1 clematis bloom on growth made the previous year. They can be pruned to keep them within their allotted space or to remove dead and unsightly foliage. If they are pruned late in the season or before they flower, however, the cuts may remove potential flower buds and reduce that year’s flowering. To prevent this, prune Group 1 clematis right after flowering.
  • Group 2
    These are the large flowered hybrids. They are often divided again into two subgroups – 2a and 2b. All of the clematis in Group 2 bloom on ‘old wood’ (actually on short shoots from old wood) and should not be pruned except for deadwood pruning in early spring after the leaf buds open slightly.
  • Group 3
    These are the summer-blooming varieties such as the viticellas and Jackmanii types that bloom on new wood and the late bloomers such as Sweet Autumn Clematis (C. terniflora) and orientalis types. Clematis in Group 3 mainly flower on new wood produced in the current year and should be pruned back severely every year in late winter, when they are completely dormant, to about 12-14 inches. Leave at least two pairs of buds on each stem of the plant. Most clematis in this group are very fast growing and will reach their full height before blooming every summer.

Once you know how to properly care for clematis, you will find it to be a welcome addition to your landscape. If you aren’t sure just what your clematis needs to thrive, our expert staff will be glad to help be sure you and your plants have a great relationship!

clematis_1

clematis_2

clematis_3

clematis_4

How To Succeed At Seed-Starting

It’s easy to buy seedlings, but there are many reasons why you may wish to start your own plants. By starting your own seeds, you have a much greater selection of flowers, vegetables and herbs to choose from. For example, old favorites like hollyhocks and less common varieties of herbs and perennials as well as heirloom vegetables might not be available as plants, or stocks may be limited. Plants with fine seeds should also be started indoors because they can easily wash away in the rain and they may have a difficult time competing with weeds. Starting your own seeds can also help you extend the growing season so you can enjoy a longer, more productive harvest. So why not get started today?

Containers for Starting Seeds

Traditionally, seeds are started in flats or peat pots. There are various sizes of plastic trays, cedar flats, peat pots and the popular Jiffy-7, a flat, peat-moss wafer, available. When moistened, the Jiffy-7 expands to form a small, self-contained pot of soil into which a seed is sown directly. This is an excellent choice when sowing seed of plants that do not like their roots disturbed during transplanting. You might also use eggshells or folded newspaper pots to start your seeds.

Seed-Friendly Soil

It is best to use a light, soilless mix when starting seeds. These mixes are sterile, meaning young seeds do not have any weed seeds to compete with, and there are no harmful bacteria, insects or other pests in the soil right away. Good seed mixes also contain adequate nutrients to carry seedlings through until transplanting. Do not use garden soil, as seeds will not germinate well in the heavy soil, and a fungus disease called damping off is common.

Temperatures for Seeds

Most seeds require warm soil in order to germinate. You will need to heat the soil of the seedling flats with a heat mat, heat tray or heating cable. Seed trays can also be placed on top the refrigerator or hot water heater. Do not put seed-starting trays on a windowsill; nighttime temperatures are too cool to allow for good germination. Seeds need consistent warm temperatures of 75 degrees or warmer for optimum germination.

Seed Watering Needs

Seeds need to be kept constantly moist in order to germinate. Moisten the soil thoroughly before planting. Water when the surface is dry with a misting nozzle or plastic spray bottle until the soil is saturated. The medium should be constantly moist, but not soggy. It is important not to overwater, which could drown the seeds and tender seedlings, but also not to permit the flat to dry out.

Sowing Seeds

Seeds should be sown 2-10 weeks before the last spring frost date. Your seed packet will provide this information as sowing dates can vary for different plant varieties or even cultivars of the same plants. Fill your containers almost to the top with moist growing mix. Tamp it down gently and smooth it out. Gently press the seeds into the mix or simply set them on the surface of the soil and place milled sphagnum moss over the top to prevent damping off. Cover the container loosely with plastic wrap or a clear dome, which will help preserve moisture and warmth. Be sure to label your containers with plastic or wood plant stakes and write the plant name and the date sowed. Set trays in a warm spot and check daily to keep evenly moist.

Seedling Care

Once seedlings have grown a half-inch or so, you should water less frequently. Let the soil dry slightly between watering, which will help the seedlings stretch and develop a strong root system. Seedlings will also need light and the best method is to use the traditional fluorescent fixtures or the new energy-saving LEDs. Suspend lights just an inch or two away from the plants. Lights must be on at least 14-16 hours a day. As your seedlings grow, raise the lights accordingly so they do not bump into the lighting fixture. If your seedlings do not get enough light, they will become weak and spindly. Fertilize seedlings weekly with half-strength, balanced, organic fertilizer. A fish and seaweed blend works well. Thin seedlings if they become overcrowded, choosing the healthiest, strongest seedlings to save.

Hardening Off and Planting Out

When the weather is warm, move your seed trays outside gradually over a 5-7 day period. Start by putting them out just for a few hours during the late morning to mid-afternoon, and then gradually increase until they are left out all day and night. Keep them in a lightly shaded, protected spot during the day to prevent sunburn. After a week or two of this transition, gently transplant seedlings into the garden. Try not to handle the root ball too much, as they are quite fragile. Water thoroughly after transplanting and again every day for about a week. Newly set out plants will look sparse at first, but they will grow and fill in quickly, leading to bumper crops and a lush, delicious harvest!

Gardener With Seedling Tray

Seedling Box Tray in Greenhouse

seed_starting_3

Acid-Loving Plants

Soil pH is a critical factor for gardening success. Some plants thrive in neutral soil while other plants prefer soil on the acidic side. The difference lies in the plant’s ability to use nutrients present in the soil. For plants that prefer an acidic soil a critical nutrient is iron. Iron is most easily available in soil with a pH of around 5.5. Without iron, acid-loving plants will turn yellow and suffer stunted growth.

What is pH?

pH stands for “potential hydrogen ions” and is the measure of acidity or alkalinity. The pH scale ranges from 0 to 14. pH less than 7 indicates acidity, pH greater than 7 indicates alkalinity and 7 is neutral. Soil pH directly affects nutrient availability. Plants grown in soil with pH above or below their optimum range will be less vigorous, more susceptible to disease, less able to fight off insects and may even be weakened to the point of death.

How pH Affects Plants

Nutrients necessary for healthy plants are divided into three categories: primary nutrients, secondary nutrients and micronutrients. Primary nutrients are (N) nitrogen, (P) phosphorus and (K) potassium. These nutrients requited in the largest amounts for plant growth and health and are represented in numbers found on every fertilizer container (for example, 20-20-20). (Ca) Calcium, (Mg) magnesium and (S) sulfur are secondary nutrients that are also required by plants. These are required in lesser amounts than N-P-K but are also essential for good plant growth. (Zn) zinc and (Mn) manganese are examples of micronutrients. Micronutrients are required by plants in very small amounts. Most secondary and micronutrient deficiencies are easily corrected by keeping the soil at the optimum pH value.

Because pH directly affects nutrient availability, acid-loving plants develop iron chlorosis when grown in soils that are too alkaline. Iron chlorosis is often misdiagnosed as a nitrogen deficiency because both present with a yellowing leaf. Chlorosis of young leaves is the first symptom of iron deficiency, while a magnesium deficiency results in yellowing of older leaves first. Nitrogen-deficient plants will not only have yellow leaves but also weak stems, underdeveloped leaves and reduced root development.

What Causes Soil Acidity

Soil pH is influenced by the kind of parent material from which the soil was formed. Rainfall also affects pH. As water passes through soil it leaches basic nutrients such as calcium and magnesium from the soil, which are replaced with acidic elements such as aluminum and iron. For this reason, soils formed under high rainfall conditions are more acidic than those formed under dry conditions. Caused by pollution, acid rain also has an influence in soil pH. The application of fertilizers containing ammonium or urea speed up the rate at which acidity develops in the soil. The decomposition of organic matter will also add to soil acidity.

Testing and Adjusting Soil pH

Before planting any plant it is best to know the optimum pH range that plant will thrive in and the pH of the soil in which you will be planting. “The right plant in the right place” is always the best policy. Purchase a pH test kit or meter. These are available at most garden centers, or you may also send a soil sample to your county extension service. This will give you a more in-depth soil analysis along with the pH. To correct soil pH it is imperative that you know the soil pH before you attempt to change it.

Adding shredded pine needles, composted oak leaves or peat moss will assist in lowering soil pH over time. A quicker fix is the addition of two materials commonly used for this purpose: aluminum sulfate or garden sulfur. Aluminum sulfate will change the soil pH instantly because the aluminum produces the acidity as soon as it dissolves in the soil. Garden sulfur requires some time for the conversion to sulfuric acid with the aid of soil bacteria. The conversion rate is based on the fineness of the sulfur, the amount of soil moisture, soil temperature and the presence of bacteria. Based on these factors, the conversion rate of sulfur may be very slow and could take several months for a full effect. Acidifiers should be worked into the soil after application to be effective. Do not apply to leaf surface or burn may result. Read and abide by manufacturer instructions when applying.

Keep in mind that it takes time to alter soil pH and your soil will tend to revert to its old pH over time, necessitating repeated treatment. Attempting to change soil pH too quickly may shock and kill a plant. A good rule of thumb is to adjust no more than one point per season. It is also important to note that fertilizers recommended for acid-loving plants do not assist in adjusting the soil pH, but are instead formulated to work well in already acidic soil.

Acid-Loving Trees and Shrubs

Want to add gorgeous plants to your landscape without worrying about acidic soil? These plants thrive in soils with low pH, or come in for an expert consultation on your soil’s pH and what plants will do best in your garden, flowerbeds and landscape.

  • Azalea
  • Bayberry
  • Blueberry
  • Camelia
  • Cranberry
  • Dogwood
  • Fir
  • Fothergilla
  • Gardenia
  • Heath
  • Heather
  • Hemlock
  • Holly
  • Hydrangea
  • Itea
  • Leucothoe
  • Magnolia
  • Mountain Ash
  • Mountain Laurel
  • Oak
  • Pieris
  • Pine
  • Raspberry
  • Rhododendron
  • Spruce
  • White Cedar
acidlovingplant3

acidlovingplant

acidlovingplant2

Endless Summer® Hydrangeas

Do you love the look of large, stunning hydrangeas? Do they evoke wistful images of summer and floral nostalgia? Don’t you wish they would last longer in the landscape? Unfortunately, many hydrangeas have relatively short bloom cycles, but there are amazing cultivars you can investigate that provide longer lasting blooms without losing any of their beauty or richness as the season progresses.

Endless Blooms, Color and Summer Luxury

Endless Summer® The Original and Endless Summer® and Blushing Bride® are the first mophead (large, ball-shaped flower) hydrangeas that bloom on both old and new growth, providing you with beautiful flowers and gorgeous color all season long. Young plants produce blooms that are 4-6 inches wide, while mature plants can have blooms as large as 8-10 inches wide, making these massive hydrangeas real show stoppers in your landscape or garden. Flower color for Endless Summer® The Original ranges from shades of blue through shades of pink, depending upon the pH level of your soil. Pink blossoms are the result of alkaline soils (pH 6-7), while more acidic soils (pH 5-5.8) will cause the plant to produce blue flowers. Adding Master Nursery Hydra Blue or other acidifying agents to the soil can help produce the lovely blue colors if your soil is initially alkaline, or you can adjust bloom color throughout the season for a vibrantly changing show. Endless Summer® Blushing Bride, as its name implies, initially offers pure white blossoms that mature to a sweet, pink blush or pale blue tinge, again depending on the soil pH.

Large, deep green leaves provide a lovely background for these spectacular flowers, which are excellent for cutting for fresh arrangements and for drying. Endless Summer® hydrangeas mature at 3-5 feet in height and width and are perfect used as standalone specimens, planted in borders or as hedges, massed under deep-rooted trees or even set in large containers. These plants perform best in partial shade with moist soil. Another big plus for Endless Summer® hydrangeas is the fact that they are cold hardy to Zone 4, giving northern gardeners a beautiful plant that will bloom well year after year.

Perfect for Mother’s Day, Father’s Day, weddings and house warming celebrations, potted Endless Summer® hydrangeas make beautiful gifts that will provide years of beauty and enjoyment. If you already have these stunning blooms in your yard, consider cutting a few for a bouquet and share the joy with friends, neighbors, family members, coworkers and acquaintances, and the interest in these amazing hydrangeas will continue to spread until the world is blooming all summer long.

endless-summer-hydrangeas-2

endless-summer-hydrangeas-3

endless-summer-hydrangeas-1

Cool Wave Pansy

Make way for Cool Wave Pansy! New and improved, bigger and brighter, the familiar little monkey-faced pansy is the new garden darling. These flowers are even more versatile and easier than ever, and ideal for so many beautiful landscaping options.

New Pansies

Cool Wave Pansy is a relatively new cultivar that has so much to offer. These flowers are ideal in beds among other plants and shrubs as a colorful vigorous filler, planted en masse as a blooming groundcover or planted to create amazing baskets and container arrangements with 30” of cascading floral beauty. Standing 6-8 inches tall and covered with three times as many blossoms as regular pansies, Cool Wave Pansies have flowers that glow in four new colors.

  • Frost: White with light blue “frost” edging along the petal margins
  • Violet Wing: Front lower petals are white edged with lavender or darker purples, backed with dark burgundy or purple on upper rear petals
  • Yellow: Bright lemony or sunny yellow blooms
  • White: Bright white petals with slight color variations for elegant interest

Growing Tips

Easy to grow, Cool Wave Pansy is much more vigorous than ever. Choose plants with an overall deep green color with plenty of buds for the best results and fastest blooming. Plant in fertile soil where the plant will receive 6 hours of daily sunlight. Use a liquid fertilizer when planting and fertilize every two weeks to maintain vigor and color. Replace with wave petunias in the summer when it becomes too warm for pansies.

Cool Wave Pansy grows well in rain or cold. In fact, it easily overwinters in many areas. This three-season performer may be planted for fall color, overwinter, and then perk up again in early spring providing an early punch of pizzazz. If it becomes too leggy, just cut back the foliage back to 3 inches tall and fertilize. In a couple of weeks, it will be smiling up at you.

When planting in containers, consider the flower and container colors to maximize the visual effect. Interplant with other textures and colors for an eclectic rainbow of vibrance. When planting in fall, add spring blooming bulbs, as they’ll easily grow through the pansies to create a riot of spring color. Spiky grasses provide a tall and contrasting effect to the pansy’s trailing tendrils, especially in larger containers.

With so many stunning options and new colors to embrace, there’s sure to be a Cool Wave Pansy perfect for all your flower planting desires!

pansy_3

pansy_1